The following section on Trailhead piqued my curiosity when going through the Lightning Web Components for Aura Developers module:
What is this render() method and how does one use it? It turns out there is very little documentation in existence today to answer that question. This blog post will attempt to provide those missing answers.
Update (11/24/2019): Salesforce added more documentation on the Render Lifecycle Hook. See: https://developer.salesforce.com/docs/component-library/documentation/lwc/lwc.create_render
Example
Let’s start off by looking at a live demo of an example Lightning web component in the Lightning Web Components Playground. Take a few minutes to try and it out and look at the source code.
You can also find the source code on Github and install the Lightning web component in your own developer org, but I recommend viewing it in the playground.
Functionality wise, this is a pretty simple Lightning web component. There is a button, which when pressed, toggles between two different layouts. When we dive in to the source code, we will see this is accomplished by switching templates using the render lifecycle hook.
File Structure
Let’s look at the source code. The first thing you may notice is the unusual file structure.
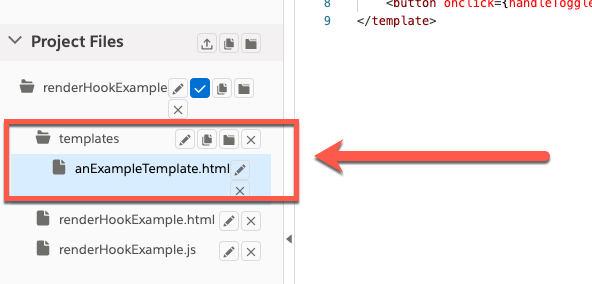
This is not a mistake. Lightning web components can contain additional html files and subfolders. There is no official documentation on exactly what file system structures are supported, but I am told that having a root level folder in your component’s directory named “templates” containing an arbitrary number of html files will be officially supported.
The JavaScript File
Next let’s look at the code in the JavaScript file.
import { LightningElement, track } from 'lwc';
import {default as mainTemplate} from './renderHookExample.html'
import {default as anotherTemplate} from './tempates/anExampleTemplate.html'

export default class RenderTest extends LightningElement {

    userName = 'User';

    @track useAnotherTemplate = false;

    render() {
        return this.useAnotherTemplate ? mainTemplate : anotherTemplate;
    }

    handleToggleButtonPress() {
        this.useAnotherTemplate = !this.useAnotherTemplate;
    }
}
By creating the render() method on line 11, we overwrite the default rendering functionality of the Lightning web component. This is because the render() method is actually a lifecycle hook in the Lightning Web Components framework. The render lifecycle hook is called whenever a reactive property changes and must return a HTML template for the component to render.
Had we not added the render lifecycle hook, the default rendering functionality would have been to the render the contents contained in the html file with the same name as the containing folder (i.e renderHookExample.html). Since we overwrote this default behavior, it is now up to us to choose what HTML template to render.
In this example, the HTML templates conditionally returned by the render lifecycle hook were imported from their respective html files on lines 2 and 3 in the JavaScript file.
Binding
Notice the property named userName on line 7 in the JavaScript file. This property is bound to both of the html files using expression syntax.
renderHookExample.html:
<template>
    <p>
        hello {userName},
    </p>
    <p>
        this is the template from lwc/renderHookExample/renderHookExample.html
    </p>
    <button onclick={handleToggleButtonPress}>toggle</button>
</template>
anExampleTemplate.html:
<template>
    <p>
        hello {userName},
    </p>
    <p>
        this is the template from lwc/renderHookExample/templates/anExampleTemplate.html
    </p>
    <button onclick={handleToggleButtonPress}>toggle</button>
</template>
In the live demo, both templates output ‘User’ as the property’s value when rendered. This shows that both templates pull the properties from the renderHookExample.js file for binding when rendered.
Conclusion
I hope you came away with a good understanding of how to use the render lifecycle hook to switch templates in Lightning web components. Please leave a comment or send me a message with any feedback or questions you may have!
Other Notes
- The dynamic creation of templates is not supported at the time of this writing. You can only create an HTML template by importing it from a pre-existing HTML file.
- Although Trailhead stated the render lifecycle hook will be used in place of dynamic component creation, it appears Salesforce may be walking back on that statement per this RFC
I included this document to my social bookmarks
Thanks for telling this particular short article and rendering it public